

Do
Your Brakes Classic American Issue 162 |
|
|
For many people who own American vehicles
it’s all about that motoring experience that can only be had from
a big American V8. These almost legendary pieces of engineering demand
a kind of respect that is contagious. Owners are often heard boasting
of 11 second quarter miles or 0 to 60mph times of less than 6 seconds.
And deservedly so, these monsters consume thousands of pounds worth
of camshafts, alloy heads and other engine internals enabling them to
reach these speeds. However, it is not as often that you hear boasting
equal to this concerning a vehicles stopping ability. Whether your vehicle
is fifty years old or just rolled out of the factory, possibly the most
important part of that vehicle is the braking system. No matter how
fast your vehicle is if you can’t stop you’re in trouble.
Now whilst most people change brake pads and shoes as a matter of course, they tend to ignore other little irregularities that creep into the system. Hands up those of you who believe you have a problem with your brakes, but are just putting off the inevitable task of making that repair. For a number of you these brake problems will more than likely share the same symptoms. The most common probably being a pulsating brake pedal. This is where you feel the brake pedal moves up and down slightly as you brake. This often goes hand in hand with front brake judder, where you will feel vibrations through the brake pedal and steering wheel. In extreme cases the entire vehicle may shake violently as you brake. Brake judder is often at its worst when braking from speed. You will be pleased to know that both of these symptoms are often caused by the same problem, a warped brake disc or drum. Again in some extreme cases both front discs may be warped. Warping, although usually associated with Star Trek, can most simply be described as a distortion of the brake disc. This can happen for many reasons, the most common being either accident damage or exposure to excessive heat. The latter is usually caused by the brakes ‘binding’, which simply means the brake pads or shoes are not releasing the brake disc or drum sufficiently, therefore the friction between the two causes heat. So if you have warped
discs, how do you go about putting them right? Well short of going to
a machine shop and having them machine your discs, until they run true,
it’s recommended that you simply replace the discs. In many cases
this is not as difficult or expensive as you might think. If the discs
are coming off then it is certainly worth checking the rest of the braking
system; after all if you are going to do a job it’s best to do
it properly. Most good parts suppliers and garages will recommend replacing
the brake pads along with the discs. Other items worth checking here
are your calipers and brake hoses for any signs of brake fluid. If you
notice any dampness due to brake fluid you obviously have a leak from
somewhere, and this should be remedied as soon as possible or further
brake failure could be just around the corner or in a ditch. A leaky
caliper may just need a seal kit, but on a time versus money scale;
it is often easier, quicker and cheaper to simply replace the caliper.
Possibly the most often over looked parts that can be replaced while
changing the discs are the wheel bearings. If possible these should
be checked for any damage such as scoring of the bearing cup or damage
to the rollers and replaced as necessary. After all this is your pride
and joy we are talking about and as such deserves nothing but the best.
The first step to better brakes is a quick call to your parts supplier, remember to have your VIN / chassis number to hand as this always makes locating the correct parts a lot easier. Also if you know of any modifications that have been made to your vehicle, be sure to let your parts supplier know. After all the supplier may not know that your 1950’s truck has had a later date Camaro front clip fitted to it. If you are thinking of taking your vehicle to a garage, and letting them make the repairs, always try and have all the parts before you book your vehicle in. If you need to order parts whilst the vehicle is at the garage, they may want to charge you storage if the vehicle can’t be moved. Remember your vehicle originates from the other side of the world, and so do the parts. With the advent of the Internet the world has become a smaller place, but some of the more obscure parts for rarer vehicles will still take some time to arrive so make allowances for this it will be worth it in the long run. Right so you have your
discs, pads and any other parts you deemed necessary to replace. If
you are going to a garage for the repair, thanks for reading and see
you next time. Those of you thinking of doing the work for yourselves
should read on. When carrying out any work where one corner of the vehicle
needs to be off the ground safety is paramount. However, follow a few
simple guidelines and everything should be fine. So as well as all the
appropriate tools you will require a good sturdy jack, a trolley jack
would be best. Along with this at least one axle stand should be used,
it is always advised that you should never work on a vehicle that is
supported with nothing but a jack. Always work on a level surface, and
just to be extra sure apply the handbrake and chock the wheels. You
have now done all you can to ensure safety. Just remember whilst death
itself may or may not hurt it is a damn inconvenience when it comes
to driving your car.
|
|
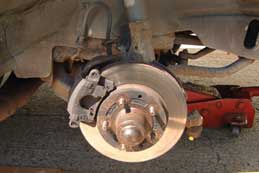 Pic 1. Support the vehicle correctly. |
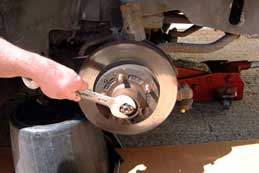
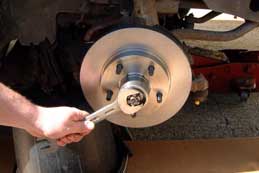
 Pic 2. Remove the caliper bolts. |
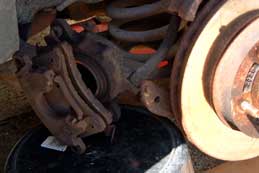
The caliper now
needs supporting; an up-turned bucket placed just behind the disc makes
an ideal support, as long as the brake hose is long enough, see pic
3. Under no circumstances should you allow the caliper just to hang
on the brake hose, this can and most likely will damage a perfectly
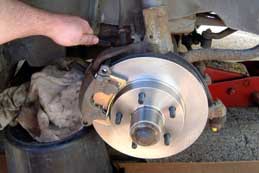
good hose. With the caliper off the next task is to remove the disc.
On some vehicles it is just a case of pulling the disc from over the
wheel studs and off of the hub. However, for a great number of American
vehicles the hub is actually part of the disc. So we need to remove
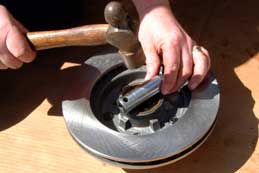
the grease cap to access the retaining / adjusting nut. This can be
done with an old screwdriver by lightly tapping it using a hammer, or
some other kind of hitting device, and then gently prying it off, see
pic 4. |
|
|
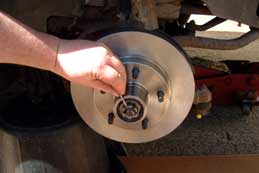
 Pic 4. Remove the dust cap. |
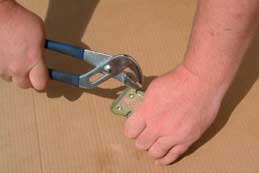
Once off you
will notice a split pin running through the end of the stub axle. Straighten
this and remove it using a pair of pliers, see pic 5. It is advisable
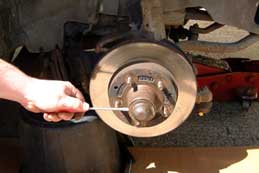
to use a new split pin when you come to reassemble. Now using an appropriately
sized spanner remove the nut, see pic 6. Behind the nut you should find
a large washer, once this is removed it is a simple task to remove the
outer wheel bearing from the hub assembly. The disc should now be free
and can be slid from the stub axle. Take care when doing this as you
may cause damage to the inner wheel bearing seal. If you are thinking
of re-using the inner seal now is the time to remove it from the old
disc. However, these seals are relatively cheap and should probably
be replaced as a matter of course. |
|
 Pic 5. Remove the split pin. |
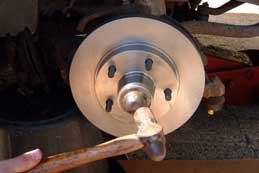
 Pic 6. Loosen the nut. |
Now is the time to decide if you are going to replace the wheel bearings. So as discussed earlier these should be checked for damage. Bear in mind that if you choose to replace the bearings and you never brought them when you ordered your discs etc, you may find the job is delayed whilst you wait for them to arrive. Please remember these could take a week or two for delivery, so please allow for this. Finally, using an old cleaning cloth, remove as much of the old grease from the stub axle, and the bearings if you are re-using them, preparation can make or break the final job. You should now be looking at a bare stub axle. With the worst behind you it is time to begin assembly. You may find, especially with good quality parts, that the new disc is coated with grease or oil to help prevent corrosion during storage. This needs to be removed using a clean cloth and a suitable solvent. With the disc clean apply good quality high temperature grease to the inner bearing race. Most good quality discs will come with this already fitted in the rear of the disc. Also apply a good coating of grease to the bearing itself and put it into its race. Making sure there is plenty of grease on and around the bearing fit the bearing into its race. You are now ready to fit the inner seal. This needs to be fitted squarely into its seat or it may be damaged as you tap it home. To make sure it sits square you need a small piece of wood or metal that is wide enough to sit across the width of the seal. Use this to tap the seal into place, see pic 7. Make sure that you fit the bearing then seal, otherwise you may find yourself removing the seal to fit the bearing. Progress is being made; you can now slide the disc on to the stub axle, see pic 8. |
|
 Pic 7. Tap the seal in to place. |
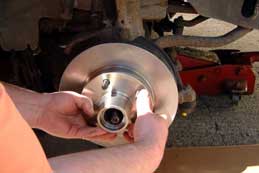 Pic 8. Slide the hub on to the stub axle. |
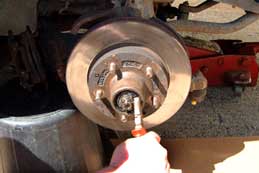
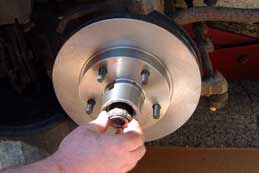
With the disc in place grease the race for the outer bearing, and then grease the bearing. Slide the bearing into its race making sure there is plenty of grease, see pic 9. It’s obvious here that Grease is the word. Remember that large washer, it is now time to put that on along with the nut and finger tighten it. This nut adjusts the wheel bearings, too loose and there will be excessive play, which can cause damage to the bearings. Too tight and the bearings will over heat which again can cause damage to the bearings. It should be adjusted so the bearing has no free play, but also allows the disc to rotate freely, see pic 10. |
|
 Pic 9. Fit the outer bearing. |
 Pic 10. Adjust the bearing. |
| With this done fit a new split pin, see pic 11, and tap the grease cap back into place, see pic 12. Once everything is back together and you have done a few miles, recheck the wheel bearings. | |
 Pic 11. Fit a new split pin. |
 Pic 12. Tap dust cap back in to place. |
If you brought
a new caliper, see pic 13, now is the time to get it out along with
the new brake pads, see pic 14. Place the pads into the caliper, making
sure you have the inner and outer pads the right way round. You may
find the pads appear to sit too loosely in the caliper, however, this
can be easily remedied. Some pads have what is called an ‘ear’,
if these are bent down just 1 or 2mm before fitting the pad will sit
much more snugly in the caliper, see pic 15. So next time you hear someone
talking about ‘clenching their ears’ this is what they are
usually referring to. |
|
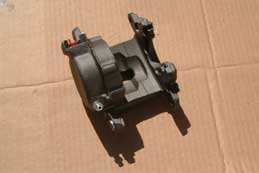 Pic 13. New Caliper. |
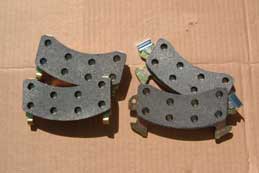 Pic 14. New Pads. |
 Pic 15. Clench your ears. |
|
|
When fitting new pads make sure that
any new anti-rattle clips or wear sensors are fitted at the same time.
If you are re-using your old caliper you may need to push the piston
back into the caliper to allow the space for the new pads. This can
be done using a ‘G-clamp’. Before doing this just loosen
the master cylinder lid. This will help to avoid a pressure build up
in the system, meaning as soon as you loosen the ‘G-clamp’
the piston slides back out again. With the master cylinder lid loose
be careful when moving the piston. If you do this too quickly you will
find yourself with an engine bay full of brake fluid! With pads fitted
slide the caliper into place. When re-fitting a caliper, be it old or
new, many brake manufacturers recommend using new bolts. This is of
course entirely your choice, but it is worth considering. If you are
using the old caliper it is also worth thinking about fitting new mounting
bushes. With the caliper in place fit the bolts and tighten, see pic
16.
If you have chosen to use a new hose, see pic 17, now is the time to fit it. |
|
 Pic 16. Fit a new caliper. |
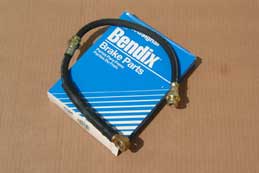 Pic 17. Fit new hoses. |
|
Take great care when trying loosen
any of the old fittings, one wrong move could end in disaster. If a
fitting is refusing to move, give it a dose of good quality penetrating
oil and wait a short while. It is better to wait for the oil to do its
job rather than have to spend more time and money having brake fittings
replaced.
Obviously if you are fitting a new caliper and hose you will need to bleed the system. This is not as daunting a task as it may first sound. Most good vehicle repair manuals have a short section concerning brake bleeding which should help you through this. So you have now fitted the disc, you have a new caliper and brake hose in place and the brake system is freshly bleed. All you need to do now is check the brake fluid level and replace the master cylinder lid. Replace the wheel and wheel nuts. Remove the axle stand and lower the jack. Now check and retighten the wheel nuts. Remove the chocks from the wheels and give yourself a pat on the back. Whilst all of this may
seem complicated, especially to someone who has done little work on
vehicles before, it is not as bad as it sounds. Just take your time,
if you feel the need make notes as you go, then do so. If you have a
digital camera take pictures so that you have a reference to show you
what goes where. Working on your own vehicle can be fun and extremely
satisfying. Not only that you may save a pound or two on garage bills
you don’t have to pay. |
|