

Clean
Machine Classic American Issue 167 |
|
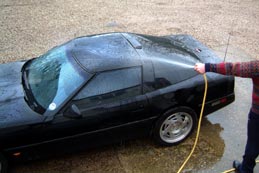
If you have ever been to a car show, and walked for hours up and down row upon row of, well, cars, you have undoubtedly noticed the varying condition of the classic American monsters that are on display. You have everything from show room condition vehicles right through to vehicles that look like they’re about to be dropped off at the scrap yard. So in a word, WHY? Why do the vehicles vary, or at least appear to vary, in condition so much. The answer to this can usually be summed up in two words, pride and expense. Some people just cannot be bothered to do anything to their vehicle, whilst others simply believe that making their car or truck look any good at all would simply cost an arm and a leg. Well to all of you out there, who think like this, think again! It need not take hours or cost a fortune to make your vehicle a little more of a head turner. We are not talking about spending thousands of pounds at the body shop or completely chroming your engine bay, we are simply talking of the best ways to clean the various parts of your vehicle. After all, a well-groomed vehicle is something you can have pride in. What we are going to do here is talk you through everything from simply cleaning your vehicle to ideas for preparing it for a show. So whether you have just got your first vehicle or you have owned Yanks for years, hopefully there will be something here for everyone. So how do we go about turning that ball of mud, fig 1, into a show-winning classic? Well your first stage to a well-groomed vehicle may sound obvious, but it is amazing how many people do not know how to get the best results from simply washing their vehicle. Hands up everyone who takes their vehicle to the local car wash. You know the type, you buy a token from the kiosk, drive your vehicle into position and then let huge heavy bristled rollers tear your aerial off, bend your mirrors, scuff your paint work and finish off by removing most of the wheel trims. Still, as that famous saying goes, “You get what you pay for.” One thing to remember is that whilst this type of car wash appear to clean your vehicle, they simply cannot reach the all the places that a hand wash can. So, if possible you may want to avoid this type of car wash. All this said it should be noted that many garages are now replacing this type of car wash with jet and pressure wash cleaners. These can be worth a visit, as they are ideal for cleaning the engine bay. |
|
 Fig 1. Corvette or ball of mud? |
|
|
To get good results from hand washing you need very
little in the way of equipment. The basics should include the following:
a hose pipe, a large bucket, a good-sized sponge, a stiff bristled brush,
a good quality car shampoo and finally a chamois leather. There are
some very good synthetic chamois leathers available so this item need
not cost you a fortune. An additional item that, though not required,
would certainly make the job easier is a pressure washer. Whilst a pressure
washer sounds like an extravagance they are relatively cheap these days
and can certainly make cleaning your vehicle a lot simpler.
As some of you
may know, the secret to washing any vehicle is to keep it wet. This
not only helps any dirt to run off, but also helps prevent any smears
or water marks appearing before you leather the vehicle. This is where
a hose or pressure washer really comes in useful, if you have one. Right,
so let’s begin. Starting from the roof of the vehicle completely
soak it, either by throwing buckets of water over it or by using the
hose, fig 2. This initial soaking will help remove any loose mud and
debris, which could possibly scratch the paintwork when you come to
actually shampoo the vehicle. |
|
|
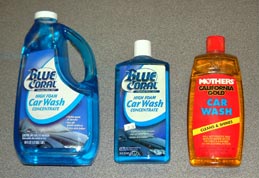 Fig 3. Quality shampoo. |
With
your bucket of hot soapy water and sponge in hand you are ready to begin.
From this point on it really is important to keep the vehicle wet. Again
starting from the roof sponge the vehicle over with the soapy water,
fig 4. Some of you may be wondering, why work from the roof down? Well,
the water carrying the dirt will run down, so it is pointless washing
the bottom of the vehicle only to have the dirt from the top of the
vehicle run off over the parts you have already cleaned. Like everything,
once you know, it’s obvious. As you finish a section, say the
roof or a quarter panel, then hose it down with cold water. This will
obviously rinse off the dirt and the soap allowing you to see if you
need to go over that section again. Carry on like this, working your
way from the roof down, until the vehicle is finished. Not much longer
and we’ll be finished the wash. You now need a bucket of cold
clean water and your leather. Rinse your leather in the water then wring
the leather getting as much of the water out of it as possible. The
secret here is a good supply of clean water to rinse the leather and
keeping the leather just damp. If the leather is too wet it will not
do its job. Again, working from the roof down wipe the vehicle down
with the leather removing all excess water, any smears that may have
appeared and any water marks, fig 5. Once you have finished this stage
you should have a vehicle that is already looking very presentable.
|
|
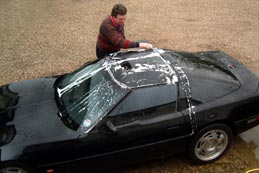 Fig 4. Wet enough? Now it's time to get soapy. |
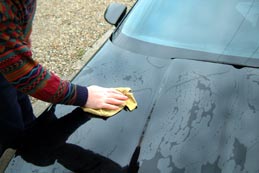 Fig 5. Leather it off... |
If
you are just cleaning your car for everyday use, then you have probably
gone as far as you want to with the bodywork. However, if you are preparing
for a show or simply want your vehicle looking as good as possible then
there is a lot more you can do. Inspect the paint for scratches and
chips. There are generally two types of scratch or chip. There are those
that will need repainting or “touching in” and then there
are those that can simply be polished out using a cutting compound such
as ‘T-cut’. You will need to deal with the chips and scratches
that need painting first. Companies such as Halfords are able to supply
a huge range of touch up paints, however if they cannot supply the correct
colour you may need to visit your local paint and body shop. Usually
they will be only too happy to mix a small pot of paint to match your
colour. Armed with your paint and a small brush go round the entire
vehicle and touch in all the scratches and chips that need paint, fig
6 shows one chip before and after touch-up. You may find that some of
the chips are quiet deep and could require the paint to be built up
in layers. If this is the case try to leave at least three to four hours
in between coats. This is obviously just a guide and will vary depending
on the type of paint you are using. With the paint built up level with
the old paint we now need to let it dry completely. Again, how long
the paint takes to dry completely will vary with paint type. A simple
guide is just leave it as long as possible. With the touch up paint
dry we can now get the t-cut out. During this step we are aiming to
blend the touched up areas into the original paint work and also remove
the finer scratches and blemishes, fig 7. If you follow the instructions
that come with the product you are using, everything should turn out
fine. |
|
 Fig 6. Touch up the paintwork. |
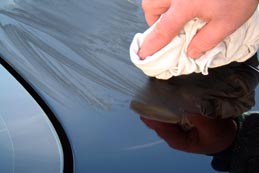 Fig 7. Removing the finer scratches. |
However,
as a word of advice always use lint free cloth for cutting and polishing
the paint work, and secondly take care if you are cutting an area that
is on the edge of a panel. It doesn’t take much effort to cut
right through the paint to the base coat. Care should also be taken
before using any cutting or rubbing compound. Some finishes, especially
some lacquers, cannot be polished back to a shine once they have been
t-cut. This is not a problem with the cutting compound but rather the
chemical makeup of the finish. So try a small area that doesn’t
show before you begin. We know of one person who completely t-cut his
Buick only to find it would not polish, this left him with a matt finish
paint job. With the paintwork prepared to your satisfaction, the next
stage is to polish or wax the vehicle, fig 8. There are numerous companies
selling polishes and waxes, Meguiar’s, TurtleWax and Mothers are
just some of the more well known brands and all of these make good quality
products. Exactly which product to select is really a matter of personal
preference, however most people seem to agree that you can’t go
far wrong with a good quality Carnauba Wax. This will usually cost a
little more than a regular polish or wax, but the results are worth
it. As always following the instructions that come with the product
will ensure the best results. Which ever product you choose do not try
to apply it if either in direct sunlight or if it is an extremely hot
day this can cause the polish or wax to smear and leave a patchy finish
on the vehicle. Although we have discussed touching up the paint, t-cutting
and waxing in the same section as washing, you may want to finish all
the washing procedures, wheels and trim for example, before you finish
off the paint work. |
|
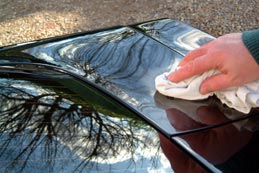 Fig 8. Polish or wax? It's up to you. |
|
With
the bodywork washed we can think about cleaning the wheels and tyres.
Many people often neglect these when cleaning their vehicles, but clean
wheels and tyres can often make or break the appearance of a car or
truck. Whether you have steel or alloy wheels the cleaning process is
basically the same. You will need a bucket of hot soapy water, a stiff
brush, a soft bristled brush a sponge and some old cleaning cloths.
Old t-shirts make ideal cleaning rags. If you want to add that professional
finish to the job then you will need a good quality tyre dressing as
well. These are usually sold in aerosol form and only cost a few pounds.
Your hose would really come in useful here as well. It doesn’t
matter where you start just pick a wheel and hose it down. Using the
soapy water and the soft brush clean the worst of the dirt from the
wheel, Fig 9. Next use the stiff brush to clean the tyre, and just like
when you washed the body, hose down in between washes to rinse off the
dirt. With this done you can now use the sponge and cleaning rags to
clean in all the nooks and crannies that the wheel may have. An old
toothbrush can be useful to get at those really hard to reach places,
fig 10. |
|
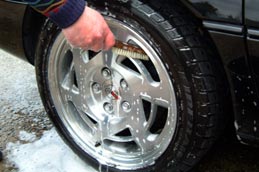 Fig 9. Use a brush to get in between the spokes |
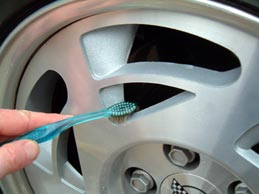 Fig 10. A toothbrush is really useful. |
There are a number of wheel cleaning chemicals available that can speed up this job. You just spray them on, leave them to work and then rinse them off. Eagle One make some of the best wheel cleaning products, their Mag Cleaner for machined finished alloys is particularly good. With the wheels and tyres clean all that remains is to spray on the tyre dressing, fig 11, and leave it to do its stuff. When you are applying the tyre cleaners and dressing, care should be taken not to get any on the actual tread area of the tyre. If you are preparing for a show you can always go one step further and remove each wheel so you can clean the inside as well. This may sound extreme, but for a show car it is often this attention to detail that can make the difference between going home empty handed or with a trophy. |
|
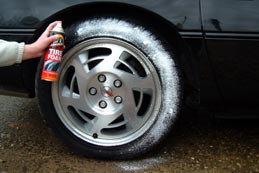 Fig 11. A finishing touch, tyre dressing. |
|
Depending on the age of your vehicle it will have varying types of exterior trim. This is usually chrome, stainless steel or moulded plastic. For the chrome and stainless trim a good wash followed by a polish with a non-abrasive chrome or metal polish will usually get great results. You may find an old toothbrush ideal for cleaning the detail of any emblems or scripts the vehicle may have as well as any other fine detailing the you may have, fig 12. As an alternative, if you have one of these small hand held power tools, such as a Dremel, you could use this with a soft nylon brush attachment set on a low speed. Used with care this should lift the dirt from even the hardest to reach places. For the exterior plastic trim, most of which seems to be black, you should use one of the many plastic or vinyl trim cleaners. Whilst there is one product out there actually branded as ‘Back to Black’, most of the trim cleaners and restorers are referred to as this. Try and find one that doesn’t contain Teflon. This tends to leave a thin slippery coating on the trim, which will attract dust and dirt. Some people do, however, like the wet-look finish these products provide. These are best applied with a sponge although some do come with their own applicator, fig 13. If your vehicle has a vinyl roof you will know its grain can hold and trap the dirt. Simply using a vinyl roof cleaner is not always enough to remove every little bit of dirt. You are probably best to attack the worst of the dirt when you are washing the car. If you use a soft fingernail brush this should be enough to lift the dirt from the grain of the vinyl. It is then just a matter of wiping the roof over with the vinyl cleaner. |
|
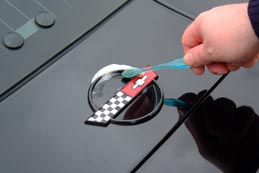 Fig 12. Use a toothbrush for fine detail work. |
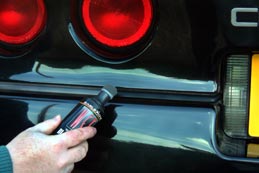 Fig 13. Complete with applicator. |
There
should now be only a couple of things that are letting down the appearance
of your vehicle. These are the weather strips and the glass. Weather
strips, if left uncleaned for a period of time, can begin to turn green
and go hard, fig 14. The easiest way to clean them is with hot soapy
water. Use this to remove all the dirt and grime. Once you have done
this you can always go back round with a good rubber cleaner. This will
help prevent discoloration. Once cleaned you should apply a rubber dressing
here to keep the weather strips supple and looking their best. This
dressing should be applied using a sponge, fig 15. Once again it is
all about attention to detail. With this done all that remains is to
clean the glass, lamps included. All the glass should have already been
washed when you cleaned the bodywork, so all you need to do is use a
glass cleaner to remove any smears and watermarks. Try to use a spray
on cleaner, mainly because it is easier to apply, and always use a soft
lint free cloth to polish your glass, fig 16. If you find yourself without
any glass cleaner you can always cheat and use two or three tablespoons
of vinegar in a pint of water. This should give you a good smear free
finish. You can spray it on using one of those plastic spray bottles
that are available from most garden centres. Just one last tip for cleaning
glass: if you have a lot of dead bugs on your screen, you can use a
little neat vinegar. Rub this over the screen with a sheet of newspaper
that’s been scrunched up and it should lift those bugs right off
the screen. You can clean all your glass like this including the lamp
lenses. |
|
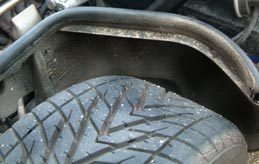 Fig 14. Weather seal abuse. |
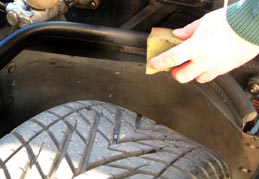 Fig 15. A little care makes all the difference. |
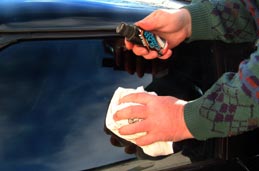 Fig 16. Finally give the glass a clean. |
|
Having
finished you should now have a vehicle to be proud of. Fig 17. Obviously
we are not saying that you can turn an old rust bucket into something
that looks like it has just rolled out the showroom just by cleaning
it. But no matter what condition your car or truck is in to start with,
you should be able to make some big improvements to its overall appearance
just by changing your approach to cleaning. So why not give it a try,
go on roll your sleeves up and get soapy. |
|
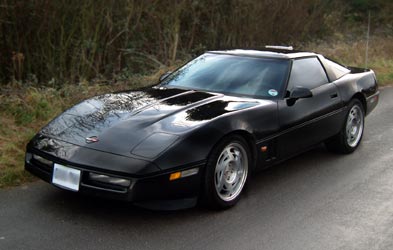 Fig 17. Mmmmm NICE! |
|