

Minister
for the Interior |
|
With
the coming of the C5 and C6 Corvettes what is in store for the older
C4. Well it still has a huge following; in fact some people would say
you couldn’t get more style and performance for your money. When
the C4 arrived on the scene it seemed to have it all, sleek lines, tremendous
road holding and all the power you could want. Unfortunately twenty-five
years after the first C4 vettes appeared some are now beginning to look
a little tired and are in need of some tender loving care. Common problems
include worn weather strips, rattles from the rear luggage compartment,
luggage compartment covers that have stopped working, worn driver’s
seat and tired or non-functioning hatch struts. The good news is it
need not cost a fortune to put these little irritations right, and make
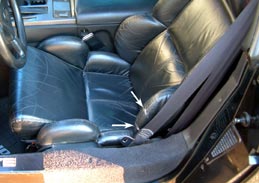
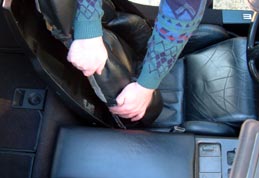
an already excellent drive that much better. For most people the condition of the interior is a major factor when it comes to buying and living with a car. The trouble is it only takes one scruffy area to make the entire interior undesirable. For C4 vette owners the side wings on the seats, especially the drivers, is a major problem. This area takes a lot of punishment, and it doesn’t take long before small cracks and tears appear in the vinyl or cloth, see fig 1. For many there are two ways of dealing with this. Firstly you could ignore it and pretend it doesn’t bother you. Secondly, funds permitting, you could take your car to a trimmer and have them re-trim the seat. There is, however, a third option, which is simplicity itself. The seat panels on the C4 vette actually detach from the framework. The back is retained by just four clips, two at the top, see fig 2, and two at the bottom, see fig 3. |
|
|
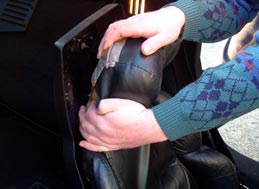 Fig 2. The upper clips. |
|
|
Once
the metal rods, which are moulded into the foam, are removed from the
clips that are attached to the seat back, the vinyl-covered foam can
be removed in a matter of seconds. The lower part of the seat is held
by just one clip. If you feel under the front of the seat you will find
the clip, just push down on the seat with one hand and swing the clip
back with the other, see fig 4. The lower part of the seat may now be
lifted clear of the vehicle. For many vette owners the passenger seat
usually shows very little signs of wear. These unworn seat panels may
be interchanged with the drivers seat panels. If the damage on your
seat is relatively low down, you may even find that it will be hidden
completely by the cars centre console. If it is not you may want to
perform a small repair prior to refitting the seats. For the repair
you will require some adhesive, a scalpel or craft knife, two or three
small brushes and some vinyl or leather dye, this should obviously match
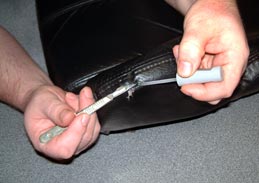
your seat colour. When the vinyl splits it usually leaves flaps; we
need to get the adhesive under these flaps. So, using your knife carefully
lift a flap of vinyl and brush some adhesive under there, see fig 5. |
|
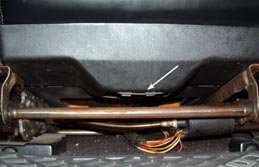 Fig 4. Front lower clip. |
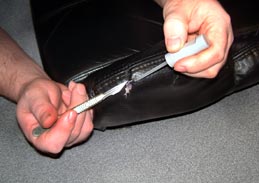 Fig 5. Get adhesive under the flaps. |
As
you remove the brush from the repair use the knife to hold the vinyl
in place, see fig 6. Next use the knife blade to lightly press the vinyl,
moving it into its final position, see fig 7. When you have stuck the
flaps of vinyl into place you will need to allow it all to dry. Drying
times will vary depending on the adhesive you have used, but as a guide
you should allow most adhesives to dry over night. When you are happy
that all is dry, you can add the final touches with the leather or vinyl
dye, see fig 8. Once any repair work is finished you have the perfect
chance to give the seats a thorough clean. As you can see from fig 9,
large amounts of dust and dirt can accumulate in the seams of the seat. |
|
|
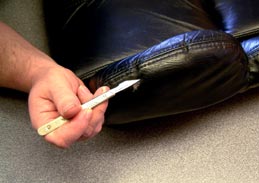 Fig 7. Press everything into place with the knife. |
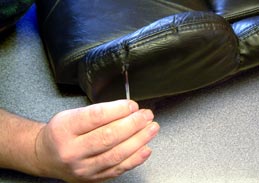 Fig 8. Finish off with leather dye. |
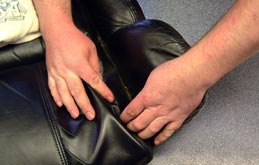 Fig 9. Dirt in the seams. |
We
used an old clean tee shirt and a soft bristled brush to remove all
the grit and the dirt from the seams, see fig 10. If the dirt is particularly
stubborn you may want to use a little warm soapy water. Once clean apply
a good quality leather or vinyl restorer, see fig 11, to bring the seats
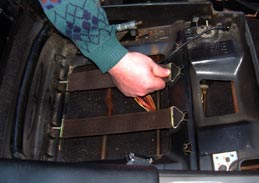
back to their original finish, see fig 12. Before refitting the seats
it is a good idea to check the straps that support the seats base, these
have a nasty habit of rusting and then breaking, see fig 13. |
|
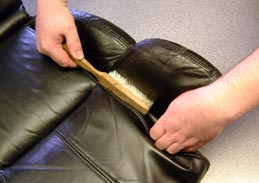 Fig 10. Clean with a soft brush. |
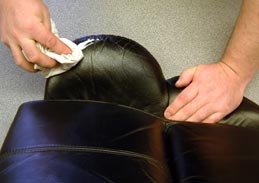 Fig 11. Use leather restorer. |
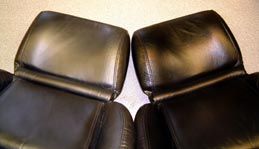 Fig 12. Before and after. |
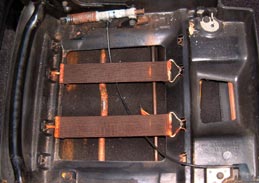 Fig 13. Rusty strap clips. |
However, these are easily replaced and certainly make for a much more comfortable ride, see fig 14. Now all that remains is to refit the seats in the car remembering to fit the drivers seat panels to the passenger seat and vice versa. It should be noted that if you have the sports seats fitted to your Corvette, then the process for removing the seat pads would vary from that described here. This is due to the lumber support and electronics that are built into the seat. |
|
|
|
We have found over the years that one of the most common problems with the C4 Corvette is interior noise. Well, we hear you say, what do you expect it is a sports car, shouldn’t you have rattles and taps irritating your every thought as you cruise around? In a word, NO, things don’t have to vibrate like a dog playing a Kazoo. The most common area for this annoyance is in the luggage compartment. The popular culprit is the plastic trim surrounding the hatch area. It’s not uncommon for this trim to be stripped out during a wiring job but then to be replaced incorrectly or simply shaken itself loose. The trim consists of three pieces of plastic moulding retained by 10 small screws. It is well worth removing the trim and refitting it correctly. So remove the screws, see fig 15, these should be cross head type, then ease the side mouldings away and then completely remove the rear moulding. This will reveal the hatch lock mechanism, various wiring to the rear lamps and the cargo blind see fig 16. Whilst the trim is off it is worth checking that the noise deadening material, (foam in this case) is lying neatly around the wiring. Also make sure that there are no electrical connectors that are hanging loose, these will tap and vibrate against any plastic trim, and will almost certainly drive you insane after a few miles. Once you are happy that everything is where it should be it is time to check under the side mouldings. If the carpet has been lifted at any time it is common for it to either not be refitted correctly or to ruck up under its retainer moulding. |
|
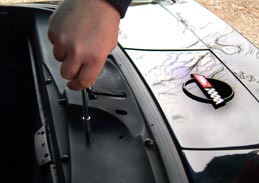 Fig 15. Remove the screws. |
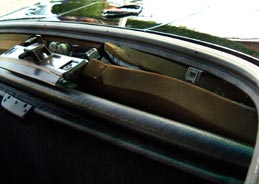 Fig 16. Hatch lock and wiring revealed. |
|
The retainer moulding runs directly under the side
trim you removed earlier, as shown in fig 17. If the carpet does not
lay under this moulding correctly then it will stop the cargo blind
from functioning properly, so now is the time to turn your hand to a
little carpet fitting. Ease the carpet back into place making sure that
any wiring lies neatly under it. It is also worth just checking the
operation of the blind at this stage. Check to make sure that the carpet
does not foul the blinds movement. Keep working with the carpet until
the blind moves in and out freely. As with the seats, while you have
the trim out you could give it a thorough clean with hot soapy water
or a good quality plastic trim cleaner. When refitting the trim remember
not to go mad with the screwdriver, it is so easy to over tighten the
screw, pulling the head through the trim. If this happens you either
have to buy new trim or resort to using large unsightly washers to help
hold the trim in place. If you still have your screwdriver out, just
check the screws in the speaker grilles. If these are loose they will
vibrate like crazy, especially if you play Led Zeppelin. John Bonham
had no idea how many screws he could shake loose! Now whilst we have
concentrated on the rear hatch trim here, the basic idea can be applied
to any of the trim around the car. Just remember to keep an eye out
for anything that may vibrate against the trim. Going around the whole
car like this may seem like quite a chore but it can quieten the interior
noise considerably.
If you found that the rear hatch kept falling on your head, while working in the luggage area, resulting in severe concussion, then the chances are your hatch support struts have seen better days. This is a common problem not only with the Corvette but any car or truck that has a hydraulic ram supported trunk lid, hatch or tailgate. You’ll be pleased to know that this can be easily rectified, and it should only take 5 or 10 minutes. Before you buy your new struts, check the old ones to see if they have the wire connector for a heated rear screen as seen in fig 18. |
|
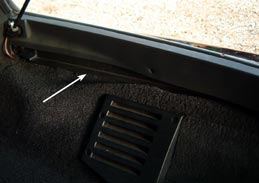 Fig 17. Retainer moulding. |
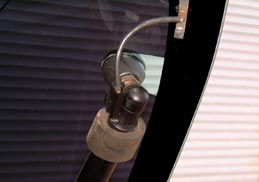 Fig 18. Connector on the hatch struts. |
Firstly,
if you have it, ease the wire from the end of the old strut, see fig
19. Then use a small bladed screwdriver to release the spring clip fitting,
see fig 20. Repeat this procedure at the other end of the strut. You
may find it useful to have someone support the hatch while you do this.
With the old strut off you can now replace it with a nice new shinny
one, see fig 21. Just a word of advice, care should be taken when removing
and fitting the wires, especially on the hatch end of the strut. It
doesn’t take much effort to pull the wire off of the small metal
plate on the hatch. Although it is only soldered on here, it doesn’t
re-solder terribly easily and there is always that possibility that
the glass hatch may crack with the heat.
Whilst you were busy fiddling with your hatch struts, you may have noticed a small puddle of water sitting in the trough just at the front edge of the hatch, see fig 22.The water that collects here can cause all sorts of problems. The most obvious problem is the lifting of the weather strip. There is also a join in the weather strip at this location, on both sides of the car. The water can cause this join to come apart; this can obviously lead to water getting into the car itself. To get round this you can install what is called a “Rear window drain kit.” This consists of two tubes approximately 3 inches long; each tube has a small metal collar at one end. You will need to drill holes in the car to fit this kit. |
|
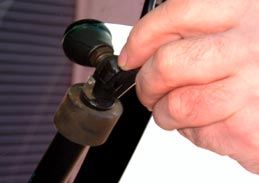 Fig 19. Remove the connector. |
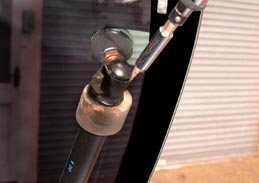 Fig 20.Be gentle with the spring clip. |
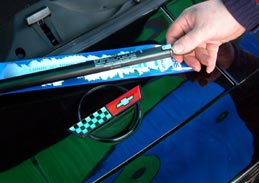 Fig 21. Nice new hatch struts. |
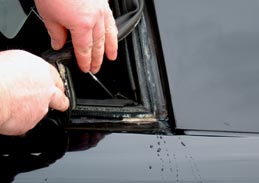 Fig 22. Water collects just here. |
| To ensure success it is advisable to mark where the hole is to be drilled on a piece of masking tap, fig 23. This serves not only to show where the hole is to be drilled but the masking tape will also help prevent the drill bit skidding around on the bodywork, fig 24. With the hole drilled insert one of the drain tubes, fig 25 and fig 26. The water will now drain safely on to the road, without ever entering the interior of your vehicle. All that remains now is to carry out a small repair on the weather strip, if it has parted at the join, then stick the strip back together. | |
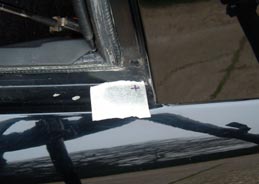 Fig 23. Use masking tape to mark the hole. |
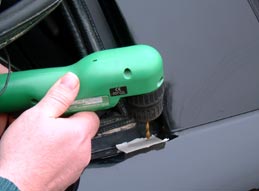 Fig 24. The helps keep the drill from slipping. |
 Fig 25. Insert the water drain pipe. |
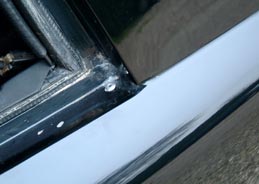 Fig 26. You don't really notice them. |
|
The repair to the weather strip is best carried out
with weather strip adhesive, fig 27. As when using any adhesive make
sure that both surfaces are clean, grease free and dry. The secret to
using weather strip adhesive is not to over do it, so closely follow
the instructions. With the repair finished it is time to stick the weather
strip back to the car, again use a weather strip adhesive for this.
We have seen people use everything from mastic to PVA and whilst they
may hold for a while they will eventually give up and you will be back
where you started. Firstly clean the bodywork, removing any old adhesive
again making sure it is dry and grease free, fig 28. Next carefully
apply the weather strip adhesive to the vehicle, fig 29. Finally press
the weather strip firmly into place. Closing the hatch will actually
hold the strip in position while the adhesive dries.
Whilst all this work has been aimed at owners of C4 Corvettes, there is no reason why the ideas that have been presented here can’t be applied to other vehicles. None of the individual tasks are terribly time consuming and will hopefully go a long way to improving the overall condition of your car. So as always grab your tools and have a fiddle, you’ll be pleased with the results. |
|
 Fig 27. Use a quality weather seal adhesive. |
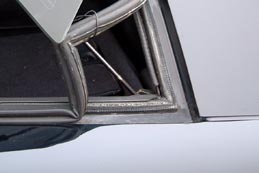 Fig 28. Make sure everything is clean and dry. |
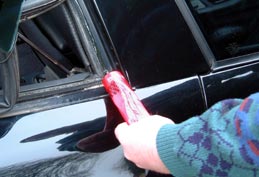 Fig 29. Take care when applying the adhesive. |
|