

Shocking Behaviour Classic American issue 176 |
|
|
|
When we think of a vehicles chassis most of us
would be thinking of the large frame under the vehicle that everything
else bolts to. However, broadly speaking the chassis can be broken
down into three sections: suspension, steering and frame. The suspension
consists of all the components responsible for giving a smooth ride
and keeping the wheels in contact with the road surface. The steering
involves all the components used to turn the vehicle and keep it pointing
in the right direction. The steering components work closely with
the suspension. Finally there is the chassis frame, which ties these
other systems together.
Let’s start
by taking a look at suspension, the different types, what problems
to look out for and how to make improvements to the various systems.
There are several different types of suspension fitted to the front
and rear of all vehicles. The most common systems for the front are
solid axle suspension, independent suspension, Macpherson strut, multi-link
and twin axle. Whilst the most common fitted to the rear are solid
axle, stamped axle and two forms of independent: modified strut and
multi-link. Whatever the type of suspension you have they usually
all consist of common components which should include springs, shock
absorbers, bushes, pivots and control arms. These parts will vary
in appearance due to the following considerations: cost, weight, design
and space available. What should be remembered here is that the rear
suspension varies from the front in as much as it is not usually involved
in the steering of the vehicle. |
|
There are four main types of independent suspension. Most easily recognisable of these is the long arm-short arm suspension, see fig 1. This is more often referred to as upper and lower control arm suspension or conventional ball joint suspension. This particular type of suspension has been around for many years and works equally well with both rear and front wheel drive vehicles. The Macpherson strut independent suspension was originally designed for use on smaller rear wheel drive vehicles, but now has found itself to be a first choice suspension for many companies building front wheel drive vehicles, see fig 2. |
|
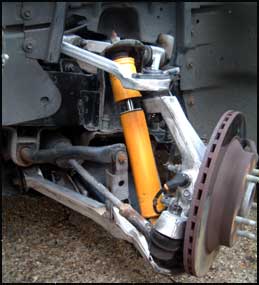 Fig 1. Long arm-short arm suspension |
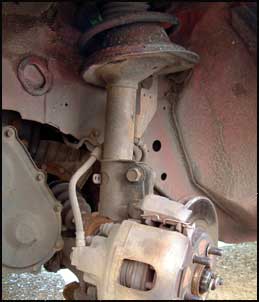 Fig 2. Macpherson strut suspension |
The
original Macpherson system does away with the upper control arm, having
the top of the strut attached to a rubber strut mount on the front inner
wheel arch, see fig 3. The area the strut mount, see
fig 4, is bolted to is often referred to as the tower.
As the system has developed many manufacturers have adapted it to suit
various applications. Some systems now employ a Macpherson strut with
an upper arm or link. It is from this system that the multi-link suspensions
have been born. These systems are said to give a vehicle more stability
than a regular Macpherson suspension system. In 1965 Ford introduced
the twin axle suspension. This was originally used on their lightweight
two wheel drive trucks. It was later adapted for use on four-wheel drive
trucks. The system consists of two short axles that reach just over
half way across the vehicle. In four-wheel drive vehicles one of these
axles usually has a differential built into it to drive the front wheels.
Out towards the wheel end of the axle there is usually a trailing or
control arm running towards the rear of the vehicle to give more stability.
|
|
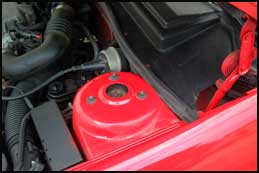 Fig 3. Strut mount in tower |
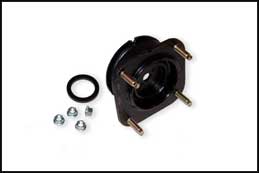 Fig 4. Strut mount assembly |
| Now let’s take a look at rear suspension systems. Solid Axle Suspension was for many years the most commonly used rear suspension, and for light trucks it still is. The axle is usually the main drive axle being given support through either leaf or coil springs. Some front wheel drive vehicles use what is called a stamped axle. This consists of either a C-section axle or a simple tube axle, see fig 5. All of this type of axle use coil springs either mounted directly to the axle or to a strut. Becoming more and more popular is independent rear suspension, see fig 6. The modified strut and multi-link are two of the more popular styles of rear independent suspension. The modified strut is a system similar to the Macpherson strut. The main difference being that the coil spring is actually mounted to the lower control arm instead of the strut. The multi-link uses a combination of upper and lower links providing increased stability and reduced tyre wear. | |
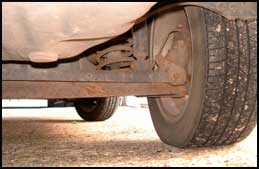 Fig 5. C-section or tube axle |
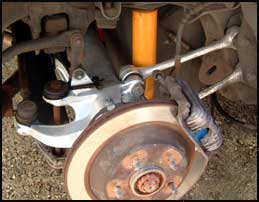 Fig 6. Independent rear suspension |
Now we have looked at various types of suspension, let’s take a look at the component parts of these systems. From this you will begin to see similarities between the many different suspension set-ups. Firstly let’s look at springs. Many people would say these are the heart of any good suspension. There are basically three types of spring fitted to cars and trucks, the coil spring, the leaf spring and the torsion bar. The coil spring is simply a steel bar that is formed into continuous coils. These coils compress to give support to any load applied to them. There are two basic types of coil spring, the constant rate spring and the variable rate spring. The constant rate spring is the simplest; all the coils in this type of spring are spaced evenly throughout the length of the spring, see fig 7. The distance between the each coil is referred to as the pitch and the angle at which each coil lies is called the pitch angle. So why do we need to know these terms, well it will make it easier to understand how a variable rate coil works. The variable rate coil achieves, well, its variable rate via a change in pitch angle through the length of the spring. This will give us a spring that has areas where the pitch of the coils is less than in other areas of the spring. This means the coil will function differently from the constant rate coil. In the variable rate coil as a load is applied the coils with less pitch will begin to touch each other, this effectively reduces the overall length of the spring increasing the springs rate. For those of you who are still wondering what we are waffling on about, the springs rate can be looked upon as its strength or ability to resist the load it is put under. Variable rate springs are often used on vehicles that do a lot of towing. Leaf springs are usually made up from several flat lengths of steel formed into a bow shape. It is this bow that gives the spring its springiness. Each flat piece of the spring is called a leaf, hence the name leaf spring. Most leaf springs are made from 4 to 6 individual leaves, although some vehicles, such as the C4 and later Corvette, have what is known as a mono leaf, just a single leaf. In the case of the Corvette this mono-leaf was made from Carbon-fibre, and is mounted transversely or across the car. In fig 8 you can just see the end of the transverse spring, from a 1990 Corvette, sitting in its bush. Leaf springs are usually mounted to the vehicle using long bolts; these bolts usually pass through rubber bushes and mounting plates at the front and rear of the spring. |
|
|
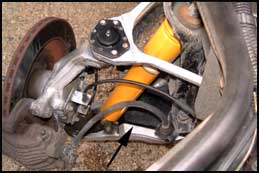 Fig 8. Carbon-fibre mounted transversely |
|
Torsion bar suspension has at its heart a straight
spring, the bar, that resists load as it is twisted. This type of spring
is often used on vehicles where there is limited space for any other
type of spring. Vehicles such as the Dodge Challenger use this type
of spring. One end of the torsion bar is fitted to the lower control
arm and the other end to the vehicles chassis frame. So as the control
arm moves up and down the torsion bar reacts to the movement in the
opposite direction, resisting the load put upon it. It should be said
that there is an advantage to be had when using torsion bars. You are
able to adjust the ride height of the vehicle, to a certain degree,
without the need to replace your springs.
So now we know more about springs and how they function, what are the tell tale signs of spring failure. The typical signs of spring wear are a vehicle that appears to sit low and or bottoms out regularly. You may also find that the vehicle ‘wanders’ or drifts to the left or right whilst driving. This is more obvious if it is the front springs that are worn. With worn front springs you will also notice the nose of the vehicle dive more than normal during braking. The final and probably the most noticeable symptom, of spring wear, is the lack of control and excessive lean the vehicle has during cornering. Whilst we have put these symptoms down to spring wear, anyone or more of the above could also be caused by a broken spring. In many ways a broken spring is more problematic and dangerous than a spring that is simply worn out. A broken spring is unpredictable, you never know how it will behave and they can cause sudden changes in vehicle handling. Now as much as we hate going against popular belief, there is only one way to solve the problem of worn or broken springs, and that is to have them replaced. Most people will
tend to replace their worn coil springs with stock specification parts;
however, you do have the opportunity here to modify your suspension
if you wish. You may want to lower the vehicle slightly or simply up-rate
the springs to improve the ride quality of your vehicle. If you want
to lower your vehicle, and it’s a popular model, you may find
that there are companies out there making springs to lower your vehicle
by a specific amount. There are numerous manufacturers making lowering
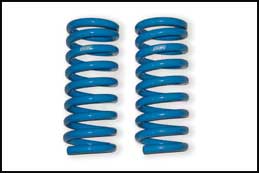
spring kits for Mustangs, for example. fig 9 shows
the rear coil springs from such a kit notice their variable rate design.
Most of these kits will lower the car by anything from ¾”
to 1½” or more. However, if your vehicle isn’t one
of the more popular models things can be a little more difficult, but
with a few phone calls to your parts supplier and some careful measuring
you should be able to get what you require.
|
|
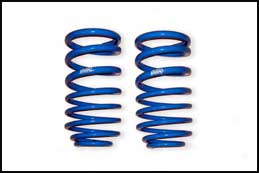 Fig 9. Lowering coils |
|
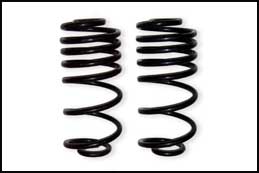
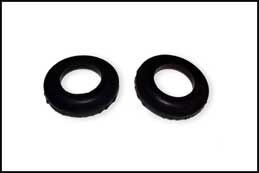
Remember that if you are planing to change the ride height of your vehicle by more than two or three inches you may find that you will need to replace your shock absorbers as well as the springs. If you are looking to upgrade your springs so you can use your vehicle for towing then you may want to consider asking your parts supplier for Cargo Coils, see fig 10. These are normally a stock sized coil but made in a variable rate design. These Cargo Coils are able to deliver a smooth ride with the added ability to withstand the riggers of towing. Once you have decided to replace your coil springs it is worth checking to see if they have insulators fitted, see fig 11. These are small doughnut shaped rubber discs that usually sit in the top of the coil helping to reduce any noise and vibration caused by the spring. If the insulators are badly worn or split it is well worth replacing them, it is this attention to detail that can make the difference between a good and a bad job. Now for some final words of advice concerning the fitting or removing of coil springs, always use a spring compressor. This simple tool does exactly what the name implies and compresses the spring. This will allow you to remove your old springs and fit your new springs with ease. We have heard terrible stories of people trying to remove coils without a compressor and ending up with broken bones. We heard of one person actually being knocked unconscious for over two hours after being hit in the head by a low flying coil spring. |
|
|
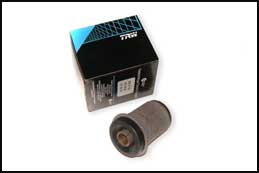 Fig 12. Leaf spring eye bush |
Moving
on to leaf springs we find that because of the way they are fitted to
a vehicle there are more parts to check. The most overlooked item is
usually the bushes. Most leaf springs will usually have one large bush
in the front of the spring, see fig 12, and two smaller
bushes in the rear of the spring, see fig 13, these
will normally be fitted one in each side of the spring. The front bush
is often referred to as the eye bush whilst the rear bushes are known
as the shackle bushes. Along with the two shackle bushes in the rear
of the spring there are usually two bushes fitted to the chassis frame
where the actual shackles hold the rear of the spring to the chassis.
If you are changing leaf springs it is always worth changing the bushes
at the same time. Fig 14 shows the broken end of a
badly rusted leaf spring with the eye bush still fitted. If the spring
had not been broken the bush would still have needed to be replaced
because of its poor condition. These bushes are normally ‘metalastic’,
a rubber bush with a metal casing. |
|
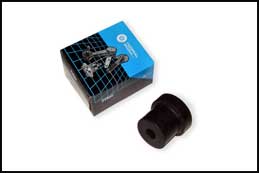 Fig 13. Leaf spring shakle bush |
 Fig 14. Broken leaf spring |
|
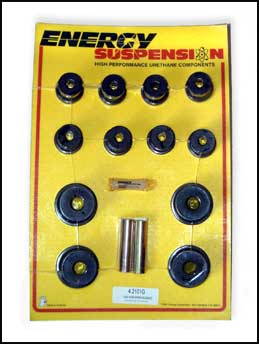
However,
more manufacturers are now able to supply bushes made from polyurethane,
see fig 15. These so-called ‘poly’ bushes
actually tighten up the feel of the suspension and as an added bonus
they normally last longer than a regular rubber bush. Many new leaf
springs will come already fitted with the front eye bush, see fig
16. It is always worth checking with your parts supplier so
you know what you are getting with your new springs. Of course the bushes
aren’t the only things to check when replacing your leaf springs.
A number of manufacturers use what is known as a shackle to attach the
rear of the spring to the chassis frame. |
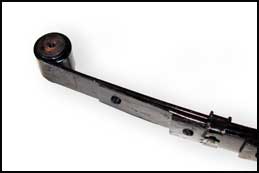 Fig 16. Leaf spring with eye bush |
|
| In
their simplest form these shackles are just metal plates that go either
side of the spring and chassis mount, see fig 17. As
can be seen from this picture this shackle is badly corroded and is
in need of replacement. If these shackles were left on the vehicle they
could fracture at any time allowing the rear of the spring to come away
from the vehicle. This could obviously be extremely dangerous. New shackles,
see fig 18, were supplied and the problem solved. |
|
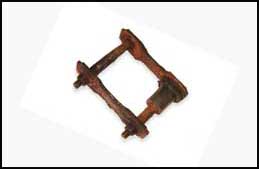 Fif 17. Old corroded shackle |
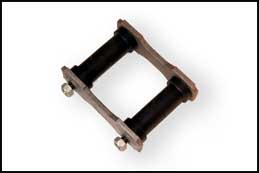 Fig 18. New shackle assembly |
|
|
Most
leaf springs are held to the axle by means of large U-Bolts, see fig
19. These should be checked for any signs of breakage or corrosion,
see fig 20, if you are unsure in any way about their
condition then they should be replaced. |
|
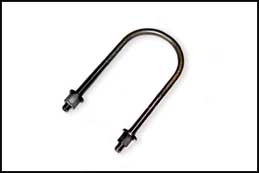 Fig 19. Axle U-bolt |
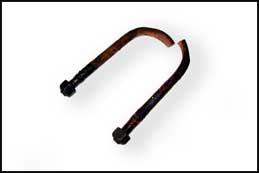 Fig 20. Old fractured bolt |
| Some
vehicles, such as the second generation Firebird and Camaro use a small
T-Bolt, see fig 21, as well as a U-Bolt in the securing
of the spring to the axle. These are just a few pounds each and for
the sake of safety they should be replaced as well. Along with the front
and rear bushes, many manufacturers insulate the axle from the leaf
spring using small rectangular pads. Again these are normally made from
rubber, but an increasing number are now made from polyurethane, see
fig 22. |
|
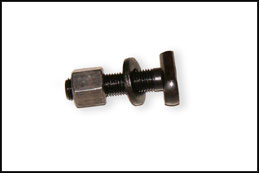 Fig 21. T-bolt |
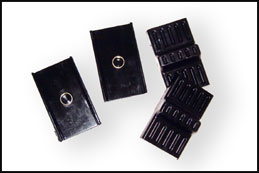 Fig 22. Spring pads |
As
you can see there is a lot going on in any suspension system and we
have only just scratched the surface here. A lot of what we have been
discussing is simply common sense, but then it is the simplest things
that are often overlooked. Next time we shall be taking a look at the
various types of shock absorbers, how they work, what part they play
in the suspension system, some of the problems associated with them
and of course the various upgrades and improvements that can be made. In the mean time we will leave you with some words from the most famous coil spring ever, “Time for bed.” |
|