

Straight
Talking Classic American issue 180 |
||
When
we left you last time, we did so with talk of alignment and terms such
as ‘toe in’ and ‘toe out’ whizzing through your
head. We also mentioned that your steering alignment could not be correctly
set-up if there were any damaged or worn parts within the system. This
time we want to look a little deeper in to the problems of worn steering
components and also delve further in to the subject of steering geometry,
this time looking at ‘caster’ and ‘camber’.
Before you ask, NO, these are not star constellations and we do not
need to seek the help of Patrick Moore to understand them. These are,
however, critical and often little understood measurements within our
steering geometry set-up. If your caster and camber angles are not set
correctly, all manner of problems can occur. These include the vehicle
pulling to one side, excessive tyre wear and wheel alignment problems.
So if you have a problem with you car wandering, and we don’t
mean it trying to chat up the car next door, or if you find the steering
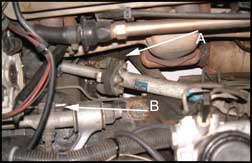
just doesn’t feel right then read on we may have the cure. So to start let’s ask the following question: What items that are likely to wear out in our steering system? The simplest answer to this is anything that moves. However, this may seem a little vague. To clarify things it may be better to say any component that has a moving part. So, ball joints for example, or any steering component that has a ball type joint as part of its construction could be classed as wearable. However, components such as drag links that simply have holes in them to take the ball joints of other component parts are normally classed as a non-wear items. On older vehicles that have kingpin set-ups, the kingpins themselves are also a wearable item and should be checked regularly. Modern innovations such as grease points, see fig 1, on steering joints and ball joints have allowed us, to a certain degree, to extend the longevity your steering components. Of course you actually have to make the effort to make greasing these joints part of your regular vehicle servicing, A in fig 2. You do of course need to use a good quality, high temperature grease. So the joints you should make part of a regular check are upper and lower ball joints and inner and outer track rod ends. On top of these also check any joints you may have in the pitman arm, idler arm and centre or drag link. As we always try to point out, spending a little time performing these regular checks now can save you a lot of time and money later. |
||
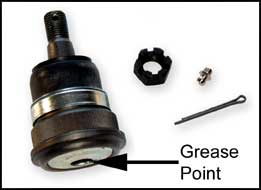 Fig 1. |
 Fig 2. |
|
|
If we look at the idler arms from older vehicles,
some of these may have a bushing where the two halves of the idler arm
join, see fig 3. This bushing can also wear causing
steering alignment problems. Therefore this bush should be made part
of your regular check. You should be aware that a lot of steering component
manufacturers are no longer making the replacement bushes for this type
of idler arm. The good news, however, is that most of these companies
are now making upgraded replacement idler arms for certain applications.
This is something you may want to check, with your parts supplier, if
you feel your idler bush needs attention. Replacing your current idler
arm with a new assembly, which is serviceable, will again save you time
and money later.
With all this talk of worn joints and bushes it is easy to forget that sometimes it is the smallest and simplest of things that cause the largest problems. You may of noticed, whilst checking your steering components, small rubber dust covers, or boots, on most of the ball type joints, see fig 4. BIG DEAL we hear most of you saying, however, most people underestimate the importance of our little rubber friends. If these are split or damaged in any way they will allow moisture in to the joint. This could be from rain, off the road or simply condensation it doesn’t really matter, once water has entered the joint the problems have already begun. |
||
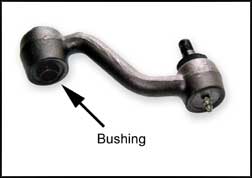 Fig 3. |
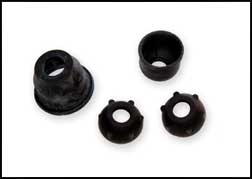 Fig 4. |
|
Obviously
corrosion is the biggest issue, especially if the vehicle is not used
on a regular basis. Once the corrosion has set in then the joint can
be considered unrepairable and should be replaced. Whilst there are
some parts people out there supplying replacement boots, we feel that
once you have discovered a damaged boot, damage to he joint itself may
have already occurred. The boots shown in fig 5 have
been neglected for some time, allowing dirt and moisture to do its job
and ruin the joints. So to save false economy we recommend replacing
the joint as a whole. Whilst this may be a little more expensive initially
it will potentially save on problems later on.
As a parallel to this
dust boot problem, those of you with a rack system should regularly
check the condition of the rubber gaiters that protect the ends of the
steering rack. Again if these are damaged in anyway they can allow moisture
to enter the end of the rack, causing all manner of problems. If you
find you have any splits or tears in the gaiter you should have the
rack checked for damage. Any problems usually result from moisture entering
and corroding the rack tube or dirt and grit entering the tube and causing
damage to the rack seals. If everything is given a clean bill of health
then just replace the gaiters, see fig 6. Worse case
scenario is that you may have to replace the entire rack, however, damage
is usually confined to the inner track rods. |
||
 Fig 5. |
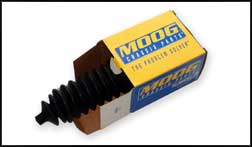 Fig 6. |
|
Moving
away from ball joints, gaiters and boots we are going to take a look
at one of the most important and yet one of the most neglected components
in the steering system, the steering coupling. This is, on most vehicles,
either a reinforced rubber block, shown as A in fig 7,
or a reinforced rubber disc that fits between the end of the steering
column and the top of the steering box or rack, see fig 8. A
lot of vehicle manufacturers have replaced the rubber component on more
modern applications with a universal joint set-up. Because of the amount
of stress this item is under, it should be checked regularly, especially
if you have the rubber type coupling. |
||
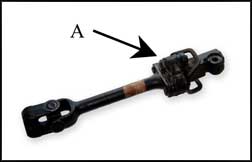 Fig 7 |
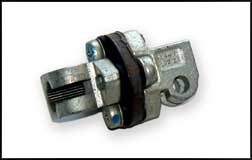 Fig 8 |
|
Because
this coupling plays such an important role in the steering system, if
you see any signs of damage such as the disc becoming oil soaked and
soft or split the coupling should be replaced immediately, see fig
9. Unfortunately one size does not fit all, and when you call
your parts supplier for a replacement you may find that they require
some measurements from the old coupling, especially if it is the disc
type. Firstly, they will probably ask for an overall diameter of the
disc, measurement 'C' in fig 10. Secondly they will
need the measurements between the bolt hole centres. These are shown
as measurements 'A' red to red and 'B' blue to blue in fig 10.
Armed with this information your supplier should have no trouble providing
the correct disc. |
||
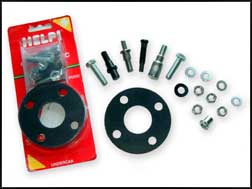 Fig 9 |
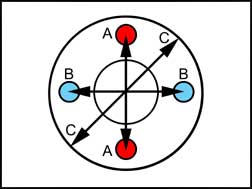 Fig 10 |
|
As
we move through our steering system it is time to become familiar with
some new terms. We did mention these at the beginning of this article,
the caster and the camber, and no these are not cooking ingredients
or rivers. To begin with let’s see if we can get a basic understanding
of each term and the problems we can expect to see if we are having
trouble with either the caster or camber angles. Let us start with the
caster. As mentioned last time, when you steer your vehicle the front
wheels turn on pivot points attached to the vehicle's suspension. On
modern vehicles this is usually a ball joint set-up, and on earlier
vehicles kingpins. The caster angle is measured in degrees and is the
amount that the upper pivot points lean towards the front or rear of
the vehicle when viewed from the side, see fig 11.
The caster if often referred to as being positive when the top of the
pivot is leaning toward the rear of the vehicle, toward A in fig
11 or towards the red in fig 12. It is said
to be negative when the top of the pivot is leaning toward the front
of the vehicle, B in fig 11 or towards the blue in
fig 12. |
||
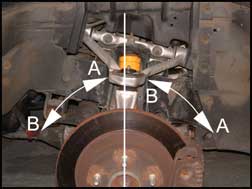 Fig 11 |
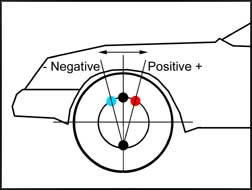 Fig 12 |
|
If
your caster is out of adjustment then you are likely to suffer problems
when you try to have the vehicles wheel alignment or tracking done.
For example if the caster angle is different on each side of the vehicle
it will tend to pull to the side with the less positive caster angle.
If you find that your vehicle has extremely light steering, wants to
wander and is difficult to keep in a straight line, then it is possible
that the caster, whilst equal on both sides of the vehicle, maybe too
negative. Almost the opposite can be said if the caster angle is too
positive. The steering will be very heavy and may be likely to kick
at the slightest bump. |
||
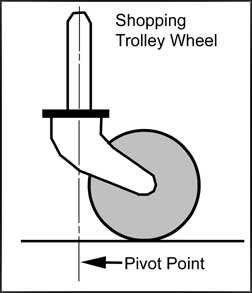 Fig 13 |
IProbably
the easiest way to understand the caster angle is to look at the wheels
on a shopping trolley, see fig 13. Whilst the pivot
point of the trolley wheel is not at an angle its line does intersect
the ground ahead of the contact area of the wheel. Whilst the wheel
is behind the pivot where its line contacts the ground it is said to
have positive caster. Now try to imagine pushing this trolley and keep
the wheel ahead of the pivot point. The wheel will constantly try to
rotate to being behind the pivot point. This is also what happens on
a car or truck when the caster angle is set too far negative. It is
this that can cause problems with wheel alignment. It should be noted
that on many front wheel drive vehicles the caster angle cannot be adjusted.
So if there is a problem with caster here, it is more likely that something
is worn or damaged and will either require repair or replacement. It
should also be noted that any problems with the caster angle have very
little affect on tyre wear. |
|
Now
let us turn our attention to the subject of the camber angle. This angle
is also measured in degrees. It is the amount the wheels lean in or
out from the vehicle when viewed from the front or rear. For example
if the top of the wheel is leaning away from the centre line of the
vehicle, towards B in fig 14 and towards the red in
fig 15, this is said to be a positive camber angle.
However, if the top of the wheel is leaning towards the centre line
of the vehicle, towards the A in fig 14 and towards
the blue in fig 15, we have what is known as a negative
camber angle. |
||
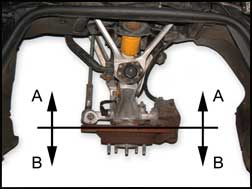
Fig 14 |
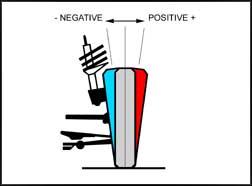 Fig 15 |
|
Unlike
the caster angle, if the camber angle is out of adjustment then this
will have a detrimental affect on tyre wear, see fig 16,
causing a tyre to wear prematurely on one side of the tread. So if the
vehicles camber angle is set too negative this will cause excessive
tyre wear on the inside edge of the tyre. |
||
Obviously,
if the camber is set too positive the wear will be excessive on the
outside edge of the tread. The vehicle will tend to pull to one side
if the camber angles a set differently on each side of the vehicle.
The pull will be to the side that has the more positive camber. Again
many front wheel drive vehicles have set-ups where the camber angle
cannot be adjusted. If this is the case with your vehicle and you have
a problem with the camber angle, once again check for worn or damaged
parts. On most vehicles both the caster and camber angles are adjusted
using small metal shims, see fig 17. These are of various
thicknesses allowing varying degrees of adjustment. For example, the
camber angle is usually adjusted by adding or removing these small shims
behind the upper control arm, thus allowing the top of the wheel to
move closer or further away from the centre line of the vehicle. |
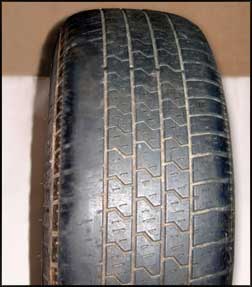 Fig 16 |
|
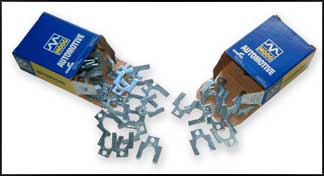 Fig 17 |
|
|
There
is one final term, which we have left till last, which is the Steering
Axis Inclination (SAI). This is a measurement in degrees that forms
part of the calculated, but not measurable, camber angle. This is not
adjustable but instead is actually part of the fixed design of the vehicle.
It should be noted that SAI is usually referred to as kingpin inclination
on older cars and trucks that use kingpins instead of ball joints. It
is the SAI that causes the front of the vehicle to lift slightly when
you turn the wheels away from the ahead position. Because of this the
weight of the vehicle causes the wheels to centre themselves, if you
release the steering wheel after you make a turn. Again if the SAI is
different from side to side on the vehicle it can cause the vehicle
to pull to one side at slow speeds. Because the SAI is not adjustable
the only way it can be incorrect is due to damaged or worn parts. These
would obviously have to be repaired or replaced to correct the problem.
Some wheel alignment machines are able to diagnose if a vehicles problem
lies with the SAI or the camber angle. If you suspect a problem with
the SAI, then finding a wheel alignment company with this type of machine
has obvious benefits. |
||
So
what have we learnt here? Nothing we hear you say! Well if nothing else
we hope you know that it is worth checking out our steering components
on a regular basis, and where appropriate treating them to a good greasing.
As we have tried to point out on many occasions, prevention is always
better than cure. It’s usually cheaper too. If you are experiencing
problems with your steering, such as a pull to one side, vibrations
or knocking. Try getting the steering alignment checked out, if this
makes very little or no difference then at least you now know where
to start looking to help solve the problem. Have the caster and camber
angles checked, if they are not adjustable on your vehicle then have
the steering components checked for signs of wear or damage. Hopefully
this will have you up and running in no time or at leased in a straight
line! Please remember that if you do require any of the parts, mentioned
within these articles, as always they can be obtained from Ultimate
Spares of America or any of the other excellent suppliers found within
the pages of this fine publication. |
||