

Trouble
at the top |
|
|
|
For those of us lucky
enough to own a convertible, we do not have to preach the virtues
of, fun and frolics to be had with such great cars, well at least
not to each other, just the uninitiated. Convertibles are meant to
be driven and enjoyed, although this would happen mainly during our
all too short but intense summer. Intense because we seem to cram
so much into so few hot months as possible. How many times have you
driven along a country lane with the top down, your favourite band
oozing from multiple speakers, day dreaming about being a film star
on sunset boulevard with a car full of beautiful women and………….sorry,
must remember, don’t type everything your thinking. |
|
Lets
take these individual components and look at the possible maintenance,
failure and cure for most of the convertible top problems. Firstly the
electrical system. As we have said a three-way switch mounted in the
dashboard or centre console see fig 1, operates the
tops motor, this three-way switch will mean a three-wire connection
at the motor assembly see fig 2. |
|
 Fig 1. |
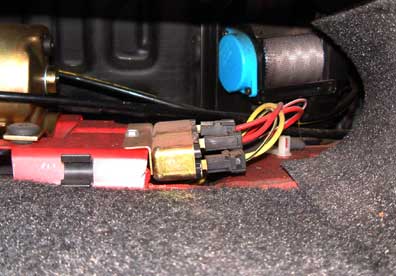 Fig 2. |
If
you believe your switch is at fault a simple continuity check, in this
part of the loom, may reveal a failure in the wiring or switch that
could be easily remedied. Breaks in the wiring are easily fixed with
bullet connectors, but for a professional job you should consider replacing
the complete switch to motor wire especially if the wiring is old or
brittle. As we have said before, a little more time spent now, could
save you from having problems in the future. If you possess a multi-meter
the test is very easy using a simple resistance check, if not a twelve-volt
bulb in a holder with two wires will suffice. The test is a simple one
and is carried out as follows. Assuming you have a meter, find the three-wire
connection at the convertible top motor. One wire will be common (earth
wire) and is usually black. Do ensure this is grounded properly, so
many electrical failures are caused by a poor earth. The other two wires
will be from the two positions of the toggle. Probe the connector with
your multi-meter set at around twenty volts fig 3,
one probe on the common the other probe to one of the other wires, fig
4. |
|
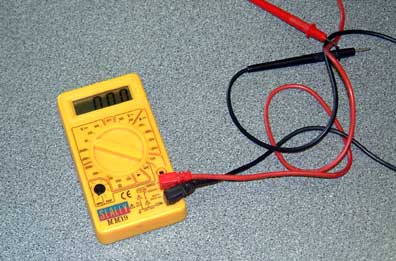 Fig 3. |
... 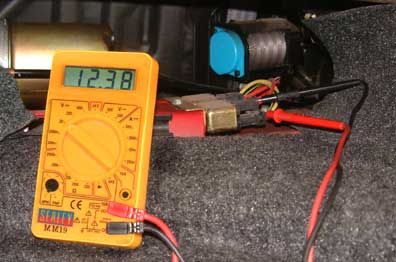 Fig 4. |
Now
have someone operate the toggle with the ignition on. Try the toggle
in both positions, one position should give a reading of around twelve
volts positive, if you are using the bulb and wire method you bulb should
light up. Now move the probe to the other wire leaving the common in
place. Now with the toggle in the opposite position you should have
a similar reading, this will, however, more than likely be a negative
voltage. The positive voltage driving the motor in one direction and
the negative voltage driving it in the other. If you do not have a reading
at one or both positions you need to check the fuse and as mentioned
earlier the wiring and toggle switch. If you find a blown fuse it would
be prudent to investigate why it has blown. Simply replacing the fuse
without knowing the reason behind its failure can lead to more expensive
problems later on. If you do get a good reading at both positions between
the switch and motor, and you have power to the motor, it would be safe
to say that the fault is elsewhere. As with most electric pumps used
on convertible tops, see fig 5, the most common cause
of failure is age. Because the motor does not get used often enough
to actually wear out, the internal parts usually just physically break
down. Because of the changes in design over the years, it is most unusual
for modern electric motors on American cars to simply fail. The most
age related problems we see are with vehicles dating from the mid seventies
and earlier. Thinking about it this isn’t too bad and says a lot
about the design of the American electric motor, and is a pretty good
track record as we are talking about thirty plus year old electric motors
only just starting to fail. The problem of motor failure can be rectified
in two ways, the most obvious is replacement of the motor, the second
option is refurbishment of the old motor. This service is available
in most parts of the country, a quick scan through the Yellow Pages
and you should find a number of companies offering a rebuild service
for your electric motor. Obviously the replacement of the electric motor
may be advisable if the hydraulic pump also has a problem. This would
be the most cost-effective way of curing two problems in one go. Moving to the hydraulic hoses, any suspected problems in this area can be checked with a simple visual inspection. The most obvious problem here is leakage. Secondly poor operation can be caused by crushed or kinked hoses fig 6. As always if you find any damage here replace the hoses as necessary. |
|
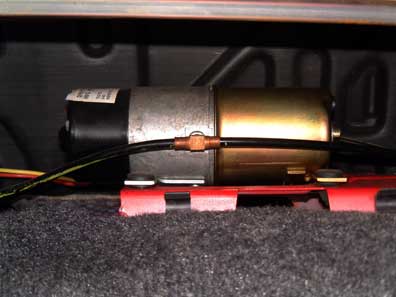 Fig 5. |
... 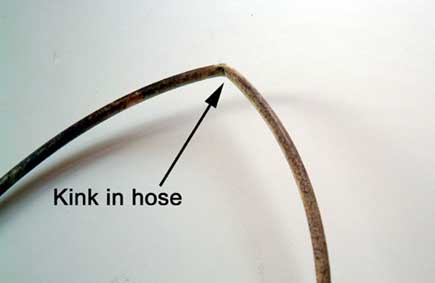 Fig 6. |
Unfortunately,
the rams are not so easily diagnosed for problems, but sometimes a visual
inspection of the hoses can reveal a problem within the ram. If you
are fortunate enough to have transparent hoses you may be able to see
air bubbles in the hydraulic fluid when the pump is operated. If this
is the case there is a good chance the ram piston or pump has a problem.
If the seals around the piston are worn they will pass air as well as
fluid. This causes the fluid to become aerated and in turn causes the
top to operate poorly or in extreme cases not at all. Most hydraulic
rams, fig 7, on cars are by the nature of their design
not serviceable, and therefore must be replaced. If your top is working
but possibly not as well as you would like it. It is always worth changing
the fluid, especially on older systems where the fluid will have become
discoloured and contaminated with age. Most convertible top pumps use
automatic transmission fluid, however, some do use brake fluid. So it
is always worth checking your handbook to find out which fluid your
system requires. Using the incorrect fluid or mixing fluids can lead
to hydraulic pump failure. After replacing the fluid always operate
the top a few times, this will bleed the system. Once you have done
this recheck the fluid level at the reservoir and top up as required.
|
|
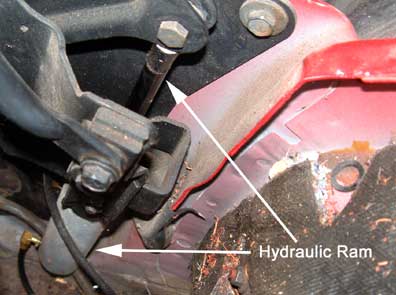 Fig 7. |
... 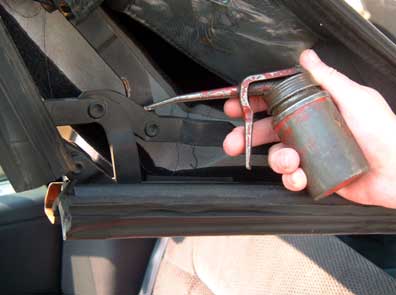 Fig 8. |
Having
checked out what we would consider the most obvious problem areas we
move on to what may be thought of regular serviceable parts. It is always
worth checking out the pivot points on the tops mechanism and lubricating
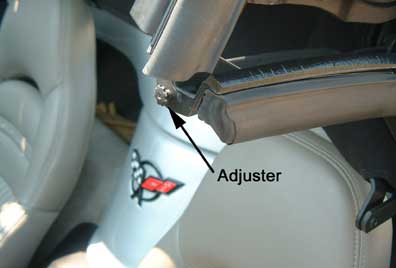
these as necessary fig 8. You should find on most convertibles,
you will be able to make adjustments at these pivot points fig
9. Making minor adjustments will allow for smoother operation
and put less stress on the whole convertible top system. Whilst checking
the pivot points remember to check the rest of the frame structure for
any bent or damaged components. |
|
|
... 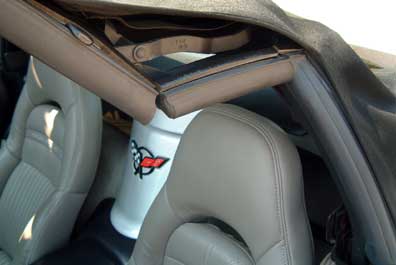 Fig 10. |
We
are now entering the final series of checks and with a convertible these
are amongst the more important. It is always worth making a close inspection
of the rubbers that seal the top to the side glass fig 10.
and header rail (front screen) fig 11. These sealing
rubbers are important in not only stopping wind noise and rain from
entering the interior (yes we have all been caught out in the Great
British summer), but also stopping those annoying squeaks and chirps
that can add up an unpleasant drive. |
|
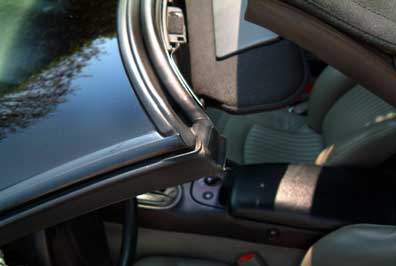 Fig 11. |
.. 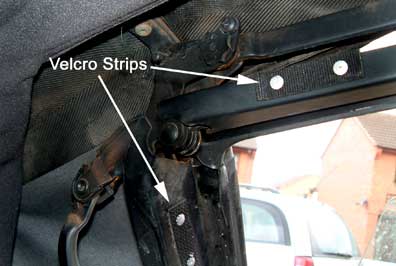 Fig 12. |
Okay
so we have lubed, adjusted, fixed and possibly replaced components,
now let us turn our attention to caring for the convertible top itself.
There are several do’s and don’ts, most of which are common
sense, you will only ever drop your convertible top and break the glass
rear window once, you will only put the top up or down while driving
and turn it into a parachute once! So as you see common sense goes a
long way to help caring for your top. As we have mentioned earlier,
unless you are a die-hard enthusiast the chances are you will only use
your convertible during our summer months. The all important point here
is storage. If you are going to lay your car up for any length of time,
it is worth considering the following. If it is stored inside always
remember to unlatch the top to take the strain off of the convertible
top material. Try to clean and treat the top before storage. Probably
the most important thing to remember is never store your car with the
top down. This will be detrimental to the material and if you have a
soft rear window the damage caused to this may be irreparable. With
the top folded there is a good chance of having moisture trapped for
long periods, this will lead to mildew and possible staining of the
fabric. The crease marks caused from ‘top down’ storage
can be permanent and in time may turn into splits. With tops that have
a removable headliner, it’s always worth removing and cleaning
this as required. Most removable headliners are simply held in place
with Velcro strips, see fig 12, and or pop fasteners.
Be careful, as there may be some stitching holding it to the hoops.
If the Velcro is not doing it’s job, it is easily replaceable
and will make for a much better fit, this will help you to lose that
‘sagging bag’ look and it will transform your interior.
Do take the time to inspect the attachment of the top material to the
top mechanism and hoops. If the material is starting to part company
with the metal hoops it must be reattached. Now whilst it may be possible
to do this yourself, your local friendly car trimmer will soon have
you and your convertible top reunited in next to no time. A well fitted
top will go a long way to making the roof mechanism operate smoothly. |
|
The
convertible top material must be cared for, regular washing with shampoo
and soft sponge is a good move, and regularly using a special convertible
top cleaner will go a long way to help prolong the life of your top,
and restore the more vibrant original colour fig 13.
Once cleaned properly you should periodically treat the material with
a good quality convertible top proofer, this will not only care for
and protect the material, but will also help to keep the material supple
and prevent the stitching from rotting. If your plastic rear window
makes you feel like you are looking through nicotine stained pub curtains,
there are products available to ‘polish’ some of the discoloration
off. |
|
 Fig 13. |
|
If
you have a manually operated top, you can ignore some of what you have
read. Many of you may be thinking that manual tops will be in the domain
of older cars. This couldn’t be more wrong, take for example,
the Corvette, no electric pumps or hydraulic rams to be seen here. The
raising and lowering of the roof is all dealt with using brut force.
This does of course mean that special care and attention should be paid
to the condition of your convertible tops frame structure. As mentioned
earlier damage to this can seriously hamper the tops operation and obviously
even more so with a manually operated roof. Of course a manually operated
top does not change the do’s and don'ts of storage and the care
of the tops material. All this should remain relevant regardless of
how your top is operated.
With the top held in place correctly and adjusted your car will take on a whole new appearance. You will find you have a new found pride in your beloved convertible, and driving it will make you feel that much better. Well, what are you waitin’ for, times a wastin’. Get your ragtop out and make the most of what we like to call……… summer. |
|
|
|